Creating and using explicit surfaces in a (new) structural model
You can use explicit surfaces from a depth shift realization as input to a new structural model and based on that, create a 3D grid. For example when you ran a volumetrics study with the Study strip and want to build a structural model (and 3D grid) based on a P10, P50 or P90 realization (see To re-run and save a single realization). Or you have just set up depth and thickness uncertainty and want to test particular sampling scenarios (for example extreme scenarios) that you want to use/QC in a new structural model and 3D grid.
It depends on your working scenario if you already have explicit surfaces in your solution. In case they do not exist yet, generate them with the QC Uncertainty form. To do this, follow steps 1 to 3 below. In case explicit surfaces already exist in your solution, you can skip step 1 to 3 and proceed directly to step 4 below.
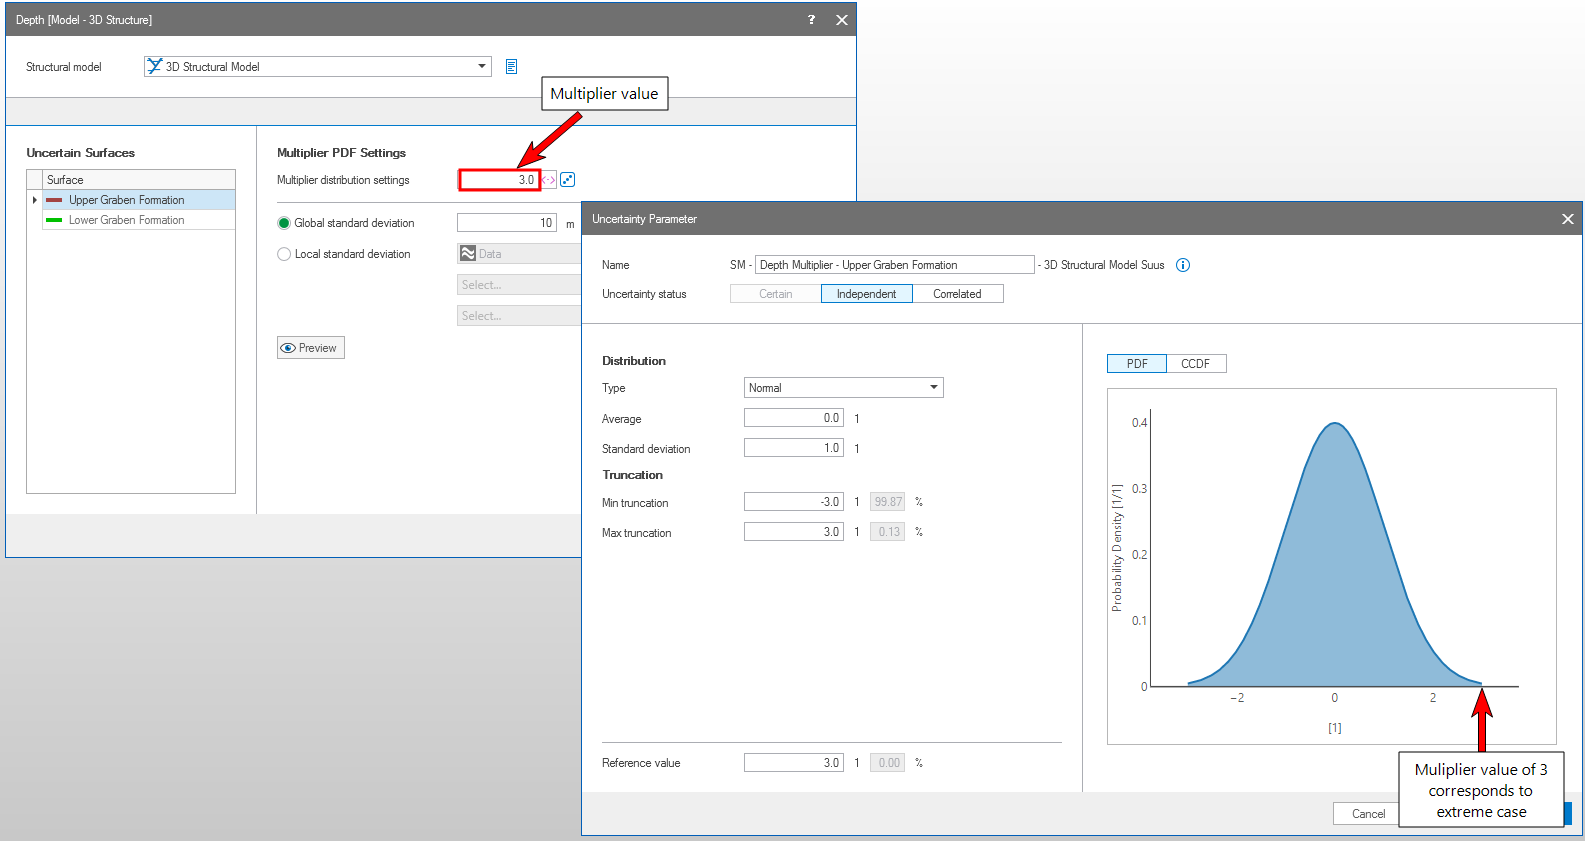
In this example, the selected surface (Upper Graben Formation) will shift with a multiplier value of 3 standard deviation. This will result in a relatively high amount of shift for this scenario, as 3 is the upper limit of the Probability Density Function of the surface. click to enlarge
To create explicit surfaces for a (new) structural model
- Run through the steps of the 'QC Uncertainty' form (see To QC depth and thickness uncertainty) with the following settings:
- The checkbox Resample all depth and thickness uncertainty parameters must be unchecked (else, the multiplier values will be resampled and you loose the sampling of your realization).
- Select Explicit surfaces in surface set.
- In the entry field behind Number of surface sets, enter 1.
- Check the Create horizon clean-up properties checkbox (the purpose of these properties is explained in section 'Background to horizon clean-up properties for explicit surfaces' below).
- Click OK on the 'QC Uncertainty' form. The shifted surfaces (tri-meshes) are stored in an auto-generated surface set with the name 'Explicit Surfaces_<name of Structural Model>_<#>.
- Verify that each tri-mesh has two properties:
- Active_<name of fault model>
- Active_ManualEdits_<name of fault model>
-
To assign the explicit surfaces to the structural model, open the 'Assign Data' form of the Structural Modeling workflow (model > 3D Structure > Assign Data). Verify that the correct structural model is selected under 'Model' at the top of the form.
In case you want to keep the previous (non-shifted) version of the structural model, make a copy of your structural model and assign the explicit surfaces to the copy.Under Source, select the Surface Set that contains the shifted surfaces, click Apply and click Yes to the 'Overwrite Structural Model' warning. Click Cancel to close the 'Assign Data' form.
- Proceed to the 'Construct Surfaces' step of the Structural Modeling workflow. Verify that the correct structural model is selected under 'Model' at the top of the form and optionally (recommended) select the Create watertight surfaces checkbox. Click Apply. When the application has finished constructing the surfaces, click Cancel to close the 'Construct Surfaces' form.
- You can now QC the (new) structural model: verify that horizon-fault offsets are proper, and optionally perform the last two steps of the Structural Modeling workflow (i.e. 'Fault Cutoff Line Edits' and 'Depth Well Matching'). The structural model is now ready to be used as input to a (new) 3D grid.
Background to horizon clean-up properties for explicit surfaces
After a surface has shifted up or down as a result of a depth uncertainty realization, existing fault gaps are no longer in the right position with respect to the faults of the structural model. The faults in the fault model have not moved. In case of non-vertical faults, the horizon surfaces will stick through the faults (see image below), which is undesirable when you want to assign these horizon surfaces as input to a new structural model.
By checking the Create horizon clean-up properties checkbox on the QC Uncertainty form, the application automatically generates the horizon clean-up properties which will solve this issue for you. With the checkbox checked, two properties are created for each explicit surface in the JewelExplorer: 'Active_<name of fault model> and Active_ManualEdits_<name of fault model>. These properties are read by the application when you construct the surfaces of the (new) structural model and will ensure that the (new) structural model will have proper horizon-fault offsets.
How the auto-generated clean-up properties work
In both properties, all parts of horizon surfaces that stick through faults are automatically set to 'inactive'. When you are constructing the surfaces of the new structural model with the Construct Surfaces step, the application 'reads' the horizon clean-up properties and exclude the 'inactive' parts from data input. This will result in proper horizon-fault offsets in the new structural model. For the principle on how horizon clean-up properties work, see Generating property 'Active_ManualEdits' using graphical editing.
When you are constructing the (new) Structural Model based on explicit surfaces, you can skip the Horizon Clean-Up step and proceed directly to the Construct Surfaces step.
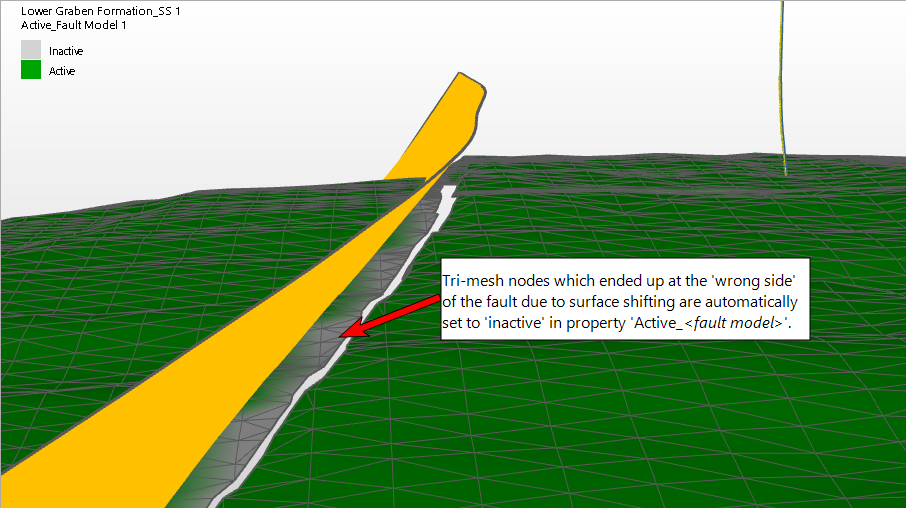
In green a shifted surface with a horizon clean-up property displayed. In orange a fault of the structural model. Tri-mesh nodes at the 'wrong' side of the fault are automatically set to 'inactive' (color gray). 'Inactive' parts will be ignored during surface construction of the new structural model, ensuring proper horizon-fault offsets. click to enlarge
To assign explicit surfaces to a (new) structural model